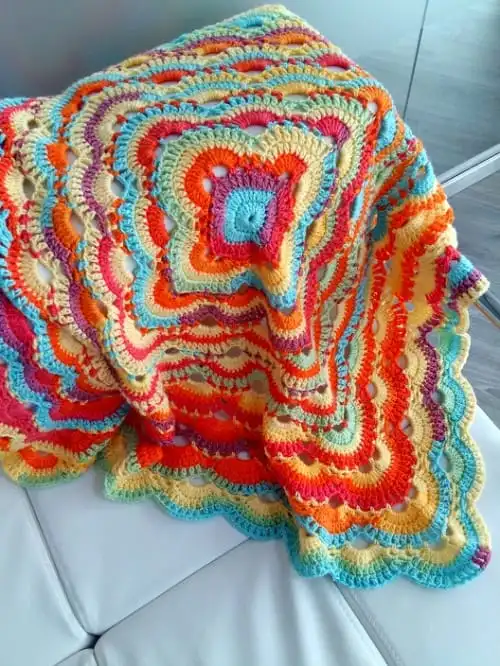
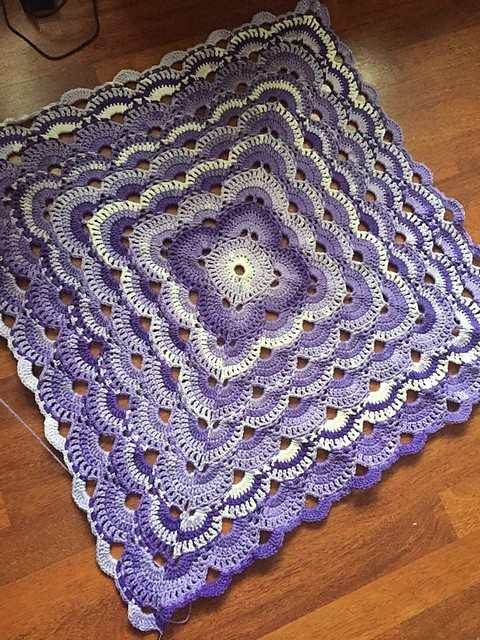
Virus Blanket Crochet Tutorial Pattern
Gather Your Materials.
To begin your virus blanket crochet project, assemble all the necessary materials. You’ll need a crochet hook in size 6mm (included instructions are based on this size), yarn needle, scissors, 1-2 skeins of DK / Light Worsted weight yarn and patterned stitch markers.Always check individual product labels for specific washing and drying instructions as different brands or types of yarn may require special care. Once you have all the materials you need, you’re ready to get started!
If you’re new to crochet, it may be helpful to review basic stitches and techniques. Beginner-friendly projects using easy stitches will provide you with practice for the virus blanket project. You can easily find tutorials online that show how to make single, half-double, double and triple crochet stitches. With a little bit of patience and dedication, you’ll soon be able to take on more complicated designs.
Choose a Pattern and Begin Working on the Foundation Row.
With the supplies prepped and ready to go, simply follow the pattern to determine how many chains or foundation stitches you will need for the virus blanket. To begin, start with a foundation row of single crochet. To do this, make a loop and pull it up onto your working hook. Then yarn over, insert the hook into the center of that loop, yarn over again and pull through two loops on your hook. Finally, yarn over one more time, pull through two loops and then three remaining loops from your initial loop (making sure you don’t miss any).
Congratulations – you’ve just completed your first stitch!Continue this same pattern until you have the number of stitches specified in your pattern. From here, shift from the foundation row to the virus blanket crochet pattern. Using your chosen colors and the corresponding stitch type (single crochet, half-double crochet, double crochet, etc.), begin forming rows of your virus blanket. Make sure to follow any increases or decreases indicated in your pattern for a perfect fit! Once you’ve finished all the rows and completed every stitch as directed, all that’s left is to bind off and weave in any loose ends. Then you can lay back and enjoy your new creation!
Keep Closely Counting Your Stitches to Assure an Even Finish.
Each time you complete a row, remember to keep counting your stitches. This will help ensure that the pattern is even and can assist in fixing any mistakes you might have made when stitching. It is best to count as you’re going row by row so that you don’t get too far ahead of yourself and lose count. The virus blanket consists of thirty-two rows, so make sure to double check each section before moving onto the next. Try saying the number out loud if that helps with keeping track of your stitches!
Double checking your progress as you go can be very beneficial when completing the virus blanket. Difficult projects like these require extra concentration and focus due to their intricate pattern. Fixing mistakes on this pattern can be quite tricky, so it is better to avoid them altogether. Always count your stitches after each row and compare the number of stitches in each section with that from before. If there are any discrepancies, think back as to when it might have happened and adjust accordingly. This method will make your work accurate and result in a beautiful finish!
Add Dimension with Slip-Stitching Details.
Adding slip-stitch details can really bring your virus blanket to life. To create the slip-stitch pattern, start by inserting your crochet needle into the stitch, yarn over and pull through both loops at once. Now you will have two loops on the crochet needle. Pull your second loop over the first and off of the needle, creating a professional looking edge. Continue this process across your rows to achieve a knitted look with your crochet stitches!
For a more detailed look, you can also add slip-stitches in various colors to the blanket. To do this, begin with the base color of your choice and then, for each additional stitch, use a contrasting or complementary color to complete the stitch. This will allow you to create intricate details that really elevate the virus blanket crochet pattern design. When incorporating these slip-stitch details into your project, make sure to take care not to make too tight of a tension when working. If the stitches are too tight, you may end up distorting the shape of your finished project.
Create a Cosy Fringe to Complete the Project!
To give your virus blanket a comfy finish, add a cute fringe. An easy way to do this is to loop 6-8 strands of yarn through the stitches along the bottom edge. This can be done by using the crochet needle to pull the middle of each bundle of yarn through the stitch and creating an even shaggy look. Knot each bundle of yarn at either end for a polished effect and trim excess yarn for a neat final product.
When adding several strands for the fringe, make sure that you loop them through in even numbers so that the blanket looks symmetrical across both ends. Be mindful of the length of each strand. If you want a fuller look, add more loops and give it a nice trim after tying the bundles on. Having too much yarn can make it difficult for loops to stay in place and may also cause unwanted pulling on the stitches of your virus blanket, so paying close attention to this step is key. With some patience and creativity, you’ll be able to give your virus blanket an extra special touch!