Pattern Crochet Flower Power Bucket Hat
Looking to spruce up your wardrobe? Look no further than this FLOWER POWER CROCHET BUCKET HAT! This stylish accessory is perfect for any season, and with a free crochet pattern, you’ll be able to make one for yourself in no time. Get all the materials you need and start crocheting today!
Gather Supplies
Before you start crocheting your bucket hat, it’s important to make sure you have all the supplies you need. This includes one skein of worsted yarn weight (4) and 4.5 mm crochet hook. You may also want scissors and a tapestry needle for sewing on pieces or weaving in ends when needed. Once you have the materials, work through each section of the pattern carefully to make sure everything comes together nicely. To get started, chain a multiple of 8 plus.
Before you begin your Flower Power Crochet Bucket Hat, it’s important to gather all the necessary supplies you’ll need. To start, you’ll need a worsted weight yarn and an H (5 mm) crochet hook. Depending on the size of hat you wish to make, you may need to buy additional supplies such as a 4’’ pompom and an optional brim for a larger hat. You may also want to have scissors and tapestry needle on hand for embellishments. In terms of colors, the size and variety of colors chosen depend on your personal style preferences. Once your supplies are gathered, place them into an easily accessible area so that you can begin crocheting your beautiful Flower Power Bucket Hat!

Create the Cap Base
Start the base of your cap by creating a magic loop. Chain 2 and then make 11 double crochet stitches into the ring. Join with a slip stitch in the starting chain and make sure your circle is even. Now you’ll move onto increasing each round until your base reaches 10 inches in diameter.
To increase each round, you’ll need to crochet two double crochets into the same stitch. You should have 24 stitches at the end of your second round and then 48 stitches when your base is 10 inches in diameter. Switch yarns now if you want a color contrast between your base and brim. After that, begin with single crochets around, working only one stitch into each stitch until you reach 14 inches in diameter. Once that happens, slip stitch together in the next stitch to make sure it’s secure and fasten off as needed if changing colors.
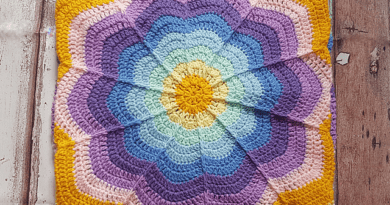
Start Adding in the Petals
Once you’ve finished creating the base of your hat, it’s time to add in some fun flowers! Start by making three chain stitches and then work 11 double crochet stitches into them. Join with a slip stitch, creating one petal. Continue adding 3 chains and 11 double crochets until you have 5 petals total. Finish up the round by joining with a slip stitch in the beginning chain and chain 2 for the next round.
Work Up the Brim of the Hat
The brim of the hat adds a nice contrast to the flower decoration and keeps it securely in place. Begin by making a foundation chain that is four chains longer than your head measurement. Work one single crochet stitch into the second chain from the hook, then two single crochets for each chain up until you reach the end. Join back with a slip stitch to the beginning chain then work three rounds of half double crochets. When you are finished, fasten off and weave in any loose ends.
To ensure a snug fit, make sure to pull the brim of the hat a bit tighter than normal. With the brim complete, you can now continue on with the flower power design. It’s easiest to start by cutting out all your petals ahead of time so that you have easy access to each one for stitching it onto the brim. Using yarn in bright colors and using different sized petals will help keep your project interesting and unique. Secure each petal into place with small stitches or a dab of hot glue as needed. Once finished, your hat should be ready to wear!