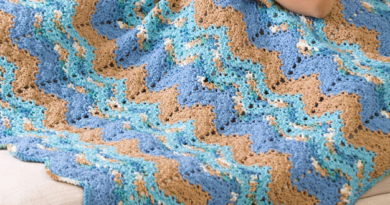
Dahlia Blanket Crochet Pattern
Before you get started on your dahlia blanket crochet project, gather all the necessary tools and materials. You’ll need a 5mm crochet hook, medium-weight yarn (choose whatever colors you want!), a pair of scissors, and a large-eye tapestry or yarn needle. Make sure to measure yourself or the person who will be using the blanket so you know how much yarn to buy!
To make your crochet project as smooth as possible from start to finish, it’s important to be prepared with all the necessary tools and materials before you start. Gather and prepare everything beforehand so that once you get going on stitching, there will be no stopping! Once you have your hooks, yarn, scissors, and needle ready to go, read through your pattern thoroughly one more time to make sure you understand everything before diving in. After that’s done – the fun begins!
Once you’ve gathered all the materials, start by chaining 250 stitches with your selected yarn and crochet hook. This chain will form the base of your dahlia blanket. Pull through the loop in your chain to make a large ring if you are starting with a slip knot. If not, simply pull the loop through itself so it looks like a round ring shape.

You’ll begin your dahlia blanket crochet pattern by working one long single crochet stitch into each stitch around the ring. This will link up all the stitches together while adding an extra layer to separate it from the beginning chain. Continue working in single crochets until you reach the end. This section will serve as your base so make sure to maintain a tight tension so that your stitches don’t become loose over time. When you reach the loop at the start of your chain, slip stitch and tighten to maintain shape and secure your work. Your base is now complete!
This technique is a staple for any dahlia crochet pattern. Working in the round, join your first dc5tog by making 5 stitches in the same stitch you’ve just chained from. From there, yarn over and pull through all 6 loops. Repeat this pattern until you have 12 dc5tog total. Now we will be working in rounds to create the flower petal shape of our dahlia blanket.
Now your dahlia blanket should have 12 petals. In order to create the desired shape and size, you will need to connect these petal formations with a single crochet stitch in each of the incomplete rows for three rounds until you reach the desired size of the blanket, running back and forth all 15 rows. This will give your dahlia a soft and elegant look.
For guidance on how to do it, watch experienced crocheters demonstrate the technique before attempting it yourself. You don’t want to risk ruining any of your hard work. After the three rounds are complete, you will have a gorgeous and unique dahlia blanket that can be enjoyed during all seasons!
Once you have completed the three rounds of single crochet stitches to connect all petal formations, finish off your dahlia blanket with a slip stitch. Go around the entire project and connect all loops neatly. This will give your blanket a distinct look and enhance its overall shape. After this step is complete, weave in any loose ends to keep everything secure and enjoy your crochet masterpiece!
Your finished dahlia blanket will look like a stunning flower quilt with circles of single crochet stitches connecting each petal formation. Carrying a uniquely vintage aesthetic, this blanket is great for any season and adds a timeless touch to any bedroom. This dahlia blanket crochet pattern allows you to make something special and lasting out of your favorite muted or vibrant colors.
SEE TOO : Red Heart Rippling Waters Throw Crochet